


Technical Hints
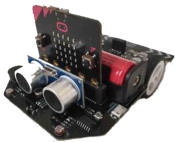
micro:rover® with micro:bit®
The micro:rover® is offered by freenove® at about 45 €.
It´s using the micro:bit® at about 15 € as programmable microprocessor.
Additionally we need a rechargeable battery 3,7V type 18650 at about 6,00 €.
Recommendable seems to be a power-charger at about 17,00 € up to 90,00€.
The vehicle is simply mounted and ready to start within 10 minutes.
Main goal of working with micro:bit® is - as like as with Calli:bot® -
programming.
For the micro:rover® are ready-code programs offered on the website github®.
After opening this link, we follow some useful hints STEP by STEP:
We assemble the rechargeable battery
into the micro:rover®,, but do NOT switch
on the vehicle.
The blue switch is up, the LEDs at the
micro:rover®, are off.
We connect the micro:rover®, with PC or
LAPTOP.
Just LEDs at the micro:bit®. are ON.
Now we follow the installation instructions
under github®:
Unzipping the ZIP-FOLDER.
Copying the result
Freenove_Micro_Rover-master at
another location, outside the ZIP-FOLDER.
In this folder Freenove_Micro_Rover-
master we choose the subfolder
PROJECTS
and then the subfolder 05.2_Rover.
In this subfolder we find the file
microbit-LineTracking.hex.
This we mark with right-click and then - by
command SEND TO - we send it to the
DRIVE, named MICROBIT.
When the yellow-green LED stops blinking,
we disconnect the cable from the
micro:bit®, put the rover on the black trace
and start it by pressing the BLUE SWITCH.
Now we should be able, to see the
micro:rover® following the black line, like
in this VIDEO.
Some interesting Links:
Tutorial , Projects, MakeCode, miro:bit.org, SCRATCH for micro:bit,
Python for micro:bit, OpenSource micro:bit, …

Technische Hinweise
micro:rover® mit micro:bit®
Der micro:rover® von freenove® kostet etwa 45 €.
Er verwendet den micro:bit® zu 15 € als programmierbaren Mikroprozessor.
Außerdem wird ein Akku 3,7V Typ 18650 zu ca. 6,00 € benötigt.
Nützlich ist ein Schnell-Ladegerät zu 17,00 € bis 90,00€.
Das Fahrzeug ist einfach zu montieren und in 10 Minuten startklar.
Der Schwerpunkt der Arbeit mit dem micro:bit® ist - wie auch beim Calli:bot® -
das Programmieren.
Für den micro:rover® liegen Programmvorschläge auf der Seite von github®.
Nachdem wir diesen Link geöffnet haben, beachten wir ein paar nützliche
Tipps SCHRITT für SCHRITT:
Wir legen den AKKU in den micro:rover®,
schalten ihn jedoch NICHT ein.
Der blaue Druckschalter ist hoch, die LEDs
am micro:rover® leuchten nicht.
Wir verbinden den micro:rover® mit
unserem PC oder LAPTOP.
Es leuchten nur die LEDs am micro:bit®.
Wir folgen nun der Installationsanleitung
unter github®:
Wir entpacken den ZIP-Ordner und
wir kopieren das entpackte Ergebnis
Freenove_Micro_Rover-master an einen
Ort, der außerhalb des ZIP-Ordners liegt!!!
In diesem Ordner Freenove_Micro_Rover-
master wählen wir den
Unterordner PROJECTS
und dort den Unterordner 05.2_Rover.
In diesem Unterordner finden wir die Datei
microbit-LineTracking.hex.
Wir klicken diese Datei mit der RECHTEN
MAUSTASTE an und SENDEN sie AN das
LAUFWERK mit dem Namen MICROBIT.
Sobald die grünlich-gelbe LED am micro:bit®
aufhört zu blinken, trennen wir das Kabel
vom micro:bit®, setzen den Rover auf die
schwarze Linie und starten ihn mit dem
BLAUEN TASTER.
Nun sollte zu sehen sein, dass der
micro:rover® der Spur folgt, so wie in diesem
VIDEO.
Einige interessante Links:
Tutorial , Projects, MakeCode, miro:bit.org, SCRATCH for micro:bit,
Python for micro:bit, OpenSource micro:bit, …


Holstentor-
Gemeinschaftsschule
mit Ganztagsangebot
2023 04 03 1622
ICT+ROBOTICs+ETHICs
Choice of Educational Material and Subjects
in Non Formal Learning Environment (elective subjects and courses)
related to the level of intellectual development of students
ICT+ROBOTICs+ETHICs
Inhalte, Methoden, Systeme, Materialien
in nonformaler Lernumgebung (frei wählbare AGn oder Kurse)
differenziert nach Entwicklungsstand der SchülerInnen
Szkoły Okrętowe i Techniczne


- AM Arrow Robot School
- AM Nitro 01 Colour Sorter
- AM Nitro 02 Corona Fighter
- AM Nitro 03 Autonomous Bus
- AM SoLe Obstacle
- AM Legorian 01 RoboDraw
- AM Legorian 02 Stairclimber
- AM Legorian 03 GyroBoy
- AM Legorian 04 Software
- AM Legorian 05 Workshop
- AM Thunderbird MAC OS
- AM Zorro Dance
- AM LiMa PullChallenge
- AM LiWa 01 Remote Robot
- AM Shower 01 DedicTrace
- AM Shower 02 Trace Follow
- AM Shower 03 Remote
- AM Shower 04 Remote Grip
- AM Shower 05 Camera Remote


- Just Unboxing ore more?
- Assembling a Vehicle
- Program Drive
- Program Dance
- Program Traffic Light
- Program WelcomeParadeFun
- Program Fan
- ERASMUS+ LABEL SCHOOL ENTRANCE
- Paper Tasks and more
- Program LineFollower
- Preparation Meeting Gdansk PL
- Twinspace cancelled but...
- Keep on Running
- Miniatur Wunderland
- Construction Colour Sorter
- Programming Colour Sorter
- Modifications
- Lifter Constructions
- General Feedback
- Remote Control
- eTwin Check
- Video Conferences
- Prep-Meeting
- Hybrid-Session 01 SKYPE
- Hybrid-Session 02 Gyro
- Hybrid-Session 03 OX
- Hybrid-Session 04 Climb
- Hybrid-Session 05 Parcours
- Hybrid-Session 06 ColourTrace
- Hybrid-Session 07 ScrachMistake
- Home-Session 01 Ethics
- Home-Session 02 About Robotic
- Home-Session 03 Feedback
- Home-Session 04 BigBlueButton
- Home-Session 05 EV3 Home
- Home-Session 06 EV3 Classroom
- Individual Sessions Micro:Bit
- Home-Session 07 PullTest
- Home-Session 08 LabView vs Classroom
- Home-Session 09 WarRobot
- Home-Session 10 -12 TRACK3R


- Save the Project!
- Teams Online 01 eTwin vs SKYPE
- Teams Online 02 Schedule
- Teams Online 03 Lockdown
- Teams Online 04 Future
- Teams Online 05 Equipment
- Teams Online 06 TraficLight
- Teams Online 07 OpenRoberta
- Teams Online 08 Applications
- Teams Online 09 SocialSciences
- Teams Online 10/11/12/13/14
- Teams Online 15/16 Organization
- Teams Online 17/18/19 Alternatives
- Teams Online 20 Scratch
- Teams Online 21 Ethics
- Teams Online 22/23/24 25/26 Lock
- Teams Online 27 Other Software
- Teams Online 28 Assocoated Sciences
- Teams Online 29 Pandemic
- Teams Online 30 Choice of Software
- Teams Online 31 Robot Cooperation
- Teams Online 32 WLAN
- Teams Online 33 micro:rover
- Teams Online 34/35/36 Array?
- Teams Online 37/38 About Robototics


